Flyback Converter Design
Flyback Converters
Before reading this section, please read the introduction.
All of the circuits in this tutorial can be simulated in LTspice®. If you are new to LTspice, please have a look at my LTspice Tutorial
Sometimes an isolated voltage needs to be produced. For low power applications, a flyback converter is another form of dc/dc converter to fulfil this need.
Flyback converters are very similar to boost converters in their architecture and performance, except with a flyback converter the inductor is replaced with the primary of a transformer and the output is taken from the secondary. However, in the flyback architecture, the primary and secondary windings can be treated as 2 separate inductors, so the flyback converter’s operation is very similar to that of a boost converter.
The following tutorial describes how to design a boundary mode flyback circuit where the circuit operates on the boundary between continuous and discontinuous conduction.
A typical flyback converter is shown in Figure 1

Figure 1
This circuit converts 12V to a pseudo-isolated 5V and can support a load of 1A. This circuit is adequate to demonstrate the operation of a flyback converter, even though it does not offer full isolation – the feedback resistors R1 and R2 violate the isolation barrier.
Ignore components R4, D2, Q2 and C5. These just provide a linear regulator function to allow the LTC3873 to be used with high input voltages.
When the FET switches on the current ramps up according to
Ignore components R4, D2, Q2 and C5. These just provide a linear regulator function to allow the LTC3873 to be used with high input voltages.
When the FET switches on the current ramps up according to
as with a boost converter.
The bottom of the primary winding is shorted to 0V so a voltage of VIN is placed across the primary. So in the case of Figure 1, the current ramps up at a rate of
or 400,000A per second. Thus if the MOSFET switches off after 1us, the current through the primary will have ramped up by 400mA.
When the MOSFET switches off, the voltage on both the primary and secondary windings increase in an effort to maintain the current flow. The winding that conducts first is the one in which the current flows and in the circuit in Figure 1, diode D1 conducts causing the energy to flow into the output capacitors C2, C6, C7.
In a boost converter, the inductor current ramps up linearly during charge and ramps down linearly during discharge. In a flyback converter, when the current ramps up in the primary, energy is built up in the transformer core. When the FET switches off this energy is dumped into the secondary allowing current to flow in the secondary, so the primary current collapses immediately to zero. This causes an immediate rise in current in the secondary, after which the current in the secondary ramps down linearly as it discharges. For the sake of analysis, it is often better to treat the primary and secondary transformer windings as two separate inductors where energy is built up in the primary and dumped into the secondary. Although a flyback converter can be considered as consisting of two separate inductors, classic transformer action still happens. When the FET switches off, the primary current collapses to zero causing an opposing rise in current in the secondary. The rise in secondary current is proportional to the collapse in primary current and is determined by the turns ratio of the transformer.
The discharge current in the secondary winding charges the output capacitor slightly after which the MOSFET switches on and the process starts again. The output voltage is monitored by the feedback resistors R1 and R2 and when the junction of these resistors reaches a certain point, the chip terminates the drive to the MOSFET.
Like with the boost converter, during charging the primary and secondary currents ramp up and down according to the equation
During the charging of the primary, L is the inductance of the primary. During discharge, L is the inductance of the secondary.
The LTspice circuit of Figure 1 can be downloaded here (right click over the link and save as a '.asc' file): LTC3873 Flyback Converter
The LTC3873 datasheet can be downloaded here: LTC3873 datasheet
We mentioned earlier that the primary current ramps up at 400,000A per second. Our LTspice simulation shows a current ramp of 408kA per second (see Figure 2).
The secondary inductance is 3.3uH, so the current ramps down at a rate of
or 1.66 million amps per second. In this case the output voltage is 5V and the voltage across the diode is 0.5V so the voltage across the secondary during discharge is 5.5V.
Our LTspice simulation shows a current ramp of 1600kA per second.
Figure 2 below shows the gate waveform (green), the primary current (blue) and secondary current (red).
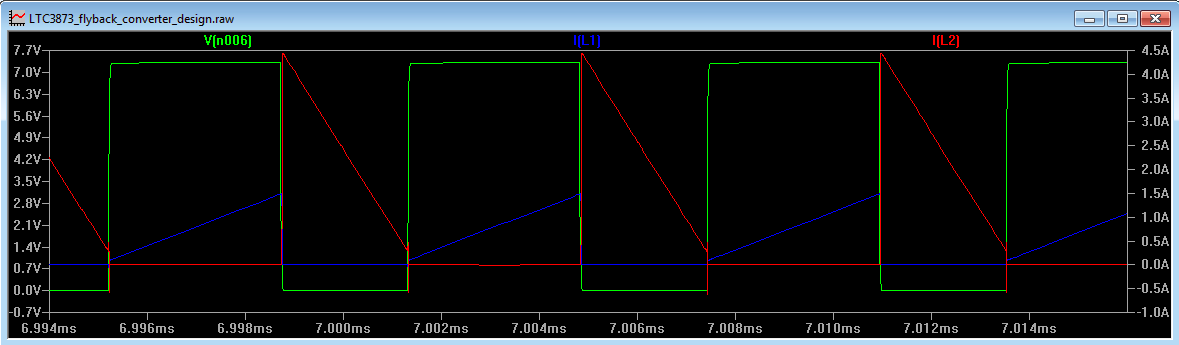
Figure 2
The LTspice circuit in Figure 1 shows the transformer modelled as two inductors. The ratio of inductance is equal to the square of the turns ratio, so the turns ratio of this transformer is 3:1. Since a transformer is a purely passive device, when the voltage is stepped down, the current is stepped up by an equal amount and vice versa. Thus when the current stops in the primary (in Figure 2 this is approx. 1.4A), a current is produced in the secondary of 3x1.4A = 4.2A.
Like with a boost converter, it is useful to know the duty cycle of the flyback converter.
We have already stated that the flyback converter is similar to a boost converter, so it makes sense to start with the duty cycle of a boost converter.
We determined that the duty cycle of a boost converter is
Now, with a boost converter when the FET switches off the voltage across the coil rises until the rectifier diode conducts. So the output voltage is equal to the sum of the coil voltage and the input voltage, so
From this
So, for a boost converter we can write
With a flyback converter, the output voltage (on the secondary) is referenced to ground, not the input voltage. Looking from the primary side, the voltage across the primary is equal to the output voltage divided by the turns ratio. So if the output voltage is 5V and we have a 10:1 turns ratio then the voltage across the primary is 50V.
So if we call Vout’ the output voltage as seen from the primary side we can say
In Figure 1, the turns ratio (primary to secondary) is 3:1. The output voltage is 5V, so the voltage across the secondary is 5.5V including the diode drop. When this is reflected to the primary this results in a voltage of 16.5V across the primary. With an input voltage of 12V, this results in a duty cycle of
In LTspice, we can measure the ON time as 3.5us and a period of 6.14us, giving a measured duty cycle of 57%.
With a boost converter, the current in the inductor must be continuous for this equation to hold true. A similar situation is true with the flyback, but a current in either the primary or secondary must be flowing for the duty cycle equation to hold true.
Similar to the boost converter, the duty cycle is only dependent on the input voltage, output voltage and turns ratio. It has nothing to do with the controller IC or the load current. Hence if the load current increases, after the circuit has settled down, the duty cycle will remain unchanged. The controller switches on the primary FET for longer in order for more current to ramp in the primary and therefore the secondary current takes longer to decay to zero, resulting in a drop in the switching frequency. However, the duty cycle remains unchanged.
The Effect of Changing the Turns Ratio
Picking a primary to secondary turns ratio equal to Vin:Vout ensures the converter operates with a duty cycle of 50%, as seen above. If the input voltage goes up, the duty cycle goes down to maintain regulation and vice versa.
If the transformer turns ratio is changed, the duty cycle changes accordingly, but changing the turns ratio also has an effect on the surrounding components.
For a high primary to secondary turns ratio, from the equation:
any given output voltage will result in a higher Vout’ resulting in a higher duty cycle, so the designer has to be careful that the maximum duty cycle specification of the controller is not violated. A higher Vout’ also means a higher voltage across the primary side FET.
Since the duty cycle is higher (the ON time of the primary FET is longer), the time to discharge the secondary is proportionately shorter, hence more current needs to flow in the secondary circuit to maintain the output current. This means a higher current flows in the rectifier diode, possibly resulting in increased heat dissipation.
However, when the primary FET switches ON, a high turns ratio means less reverse voltage is applied across the secondary diode.
Similarly if the designer chooses a low primary to secondary turns ratio, the duty cycle is lower and the voltage across the primary side FET (Vout’) is lower. However, since the ON time of the FET is shorter, more current needs to flow in the primary FET resulting in higher switching and conduction losses.
Since the ON time is shorter, the discharge time of the secondary is longer so the current in the secondary diode is lower. However, the reverse voltage across the secondary diode is higher.
Having a turns ratio equal to something other than Vin:Vout is not necessarily a bad thing. The turns ratio is just another variable in the design process that could be used to the designer’s advantage.
Flyback Converter Design Procedure
We are now going to use a circuit similar to Figure 1, but this time to boost a voltage of 5V to 12V that can support a load of 100mA. We are going to use the LTC3873-5, a fixed frequency 200kHz controller.
Unlike with a boost converter where inductors are available in many different values, the perfect transformer turns ratio might be hard to come by. Therefore it is wise to start the design by choosing a transformer that is close to where we need to be and adjusting the components in the design to compensate for its shortcomings. Many power supply books explain how to calculate the ideal transformer primary inductance and turns ratio, but most engineers do not have the luxury of a custom transformer service available.
The turns ratio affects the peak primary current, peak secondary current and the duty cycle. In our example, if the turns ratio is too low (less turns on the primary) the duty cycle decreases and the primary current increases (this is logical because if the MOSFET is on for a shorter duration, more current needs to be ramped in the primary per cycle). If the turns ratio is too high the output voltage reflected back to the primary will be greater meaning a higher voltage MOSFET will be needed. In addition, the duty cycle will be longer (the ON time of the MOSFET), so the OFF time (the time when the secondary current is supplying the output capacitor) will be shorter, so more secondary current needs to flow to furnish the load.
A primary to secondary turns ratio of approximately Vin:Vout is a good place to start. So with 5V input and 12V output a turns ratio of 1:3 is a good choice.
The circuit we are going to design will assume the secondary current ramps down to zero after which the primary MOSFET immediately switches back on again to begin charging the primary. In other words, the part is working on the boundary between continuous conduction mode (where current is always flowing in either the primary or the secondary) and discontinuous mode (where there is a region of zero current in both windings before the MOSFET starts charging the primary again). We will design for maximum load, therefore if the load current decreases, there will be a delay between the secondary current ramping down to zero and the primary current charging again (discontinuous mode).
Figure 3 shows our outline architecture.

Figure 3
Referring to Figure 2 earlier in the text, we see that the secondary current is triangular ramping down from a peak value to (nearly) zero. The area under this red waveform needs to have an average of 100mA to support our load. Since the waveform is triangular, the peak of the current needs to be at least 2 x 100mA = 200mA. However, the secondary current is only present for a certain amount of time (dictated by the duty cycle), so the current needs to be considerably greater than this.
A flyback converter has a duty cycle of
where
(i.e. Vout’ is the output voltage, but as seen by the primary side)
Earlier we calculated the duty cycle ignoring the diode drop. We can now include it without too much hardship. If we include a diode drop of 0.3V in our duty cycle equation, our value for Vout’ is 12.3 x 0.33 = 4.1V, so the duty cycle is
Obviously the lower the output voltage, the more influential the diode drop is in our duty cycle equation.
The primary current flows during the ON time of the MOSFET and the secondary current flows during the OFF time of the MOSFET, so the secondary current is only present for (1-DC) during each cycle. Therefore to get the desired peak secondary current, we need to divide the peak 200mA current (calculated above), by (1-0.45) to get the true secondary peak current needed.
Thus the peak desired current in the secondary is
For a more mathematical derivation of the above procedure, Click Here
A 364mA peak current in the secondary, with a turns ratio of 1:3 means a peak primary current of 1.09A (going from secondary to primary, the voltage goes down so the current goes up in this configuration).
A 200kHz switching frequency has a period of 5us, so with a duty cycle of 45%, this represents an ON time of
0.45 x 5us = 2.25us
From
during the MOSFET ON time, the voltage across the primary is 5V and we need a current ramp from zero to 1.09A in 2.25us, so this implies a primary inductance of 10.32uH
So we need to pick a transformer with a primary inductance of approximately 10uH, with a saturation current rating of at least 1.09A and a turns ratio of 1:3. This is quite a specific requirement and the reader will probably find it impossible to find a transformer with such characteristics. All is not lost however, as magnetics companies are now introducing general purpose transformers with 6 windings on one bobbin that can be configured in any way. Wurth Electronics provide such a series of parts with the WE-FLEX Flexible Transformers.
Since we have more current on the primary than secondary, it makes sense if our design has 3 windings in parallel for the primary and 3 windings in series for the secondary. This ensures each of our 3 windings shares the 1.09A current and gets us our 1:3 turns ratio.
The Wurth 749196221 is a suitable device.
We must ensure that the transformer has a current rating of at least 1.09A. If we exceed this current, the ferrite that the transformer is wound on will saturate and lose its magnetic properties. Thus the inductance value of the primary will collapse and from the equation
the current will increase rapidly, thus blowing up the primary side MOSFET.
Now, parallel inductors wound on the same ferrite do not follow the same laws as separate inductors placed in parallel. They keep the same overall inductance value, but share the current. This is explained the following Wurth document:
Thus the 749196221 has an inductance of 11.6uH per winding and 3 in parallel will still give a primary inductance of 11.6uH. As they share the current, the saturation current of 0.84A allows us to have (3 x 0.84A = 2.52A) peak primary inductor current.
If a suitable transformer cannot be found, select a dc/dc converter with an adjustable switching frequency (hence changing the parameter ‘dt’ in the above equation) and repeat the steps above.
Rsense Choice
The current sense threshold on the LTC3873-5 is 95mV, so a current sense resistor of 63mOhms ensures a peak current of 1.5A. The above calculations have not accounted for the efficiency of the dc/dc converter, so a current sense resistor of approx. 80% of this value is a more realistic figure. A current sense resistor of 50m Ohms should suffice.
MOSFET Choice
With an output voltage of 12V, the voltage on the secondary winding is 12.3V (including a diode drop of 0.3V). Therefore when the MOSFET switches off, the primary winding develops a voltage of 12.3V/3 = 4.1V. Thus the MOSFET drain has to withstand a voltage across its drain of 4.1V + Vin = 9.1V.
Now, it is worth choosing a MOSFET with a drain source rating much higher than this since any transformer will not perfectly couple the primary energy into the secondary. This term is called leakage inductance and can be modelled as an inductance in series with the primary that is not coupled to the secondary. Thus it stores energy that is not dumped into the secondary during the flyback cycle. This energy manifests itself as a voltage spike on the drain of the MOSFET. This spike increases with primary current and if it is high enough, a snubber network may be required to reduce it.
In our design a MOSFET with a drain source voltage of 30V should suffice.
The drain current of the MOSFET needs to be higher than the peak current set by the current sense resistor. Choosing a MOSFET with a drain current of 3A leaves us plenty of headroom.
The gate source turn on voltage of the MOSFET needs to be much lower than the voltage of the gate pulses coming out of the chip (5V).
The above parameters represent the bare minimum characteristics of the MOSFET. However, to get a good design, we must ensure that the losses in the MOSFET are as low as possible. The MOSFET switch presents 2 losses in the circuit: switching losses and conduction losses.
The switching losses result from current flowing through the MOSFET at the same time that a voltage is across the MOSFET (so power is generated in the MOSFET), during the turn on and turn off times of the MOSFET. For a given gate drive coming out of the controller IC, the lower the Gate-Source capacitance of the MOSFET, the quicker the MOSFET will turn on. Thus the Qg specification of the MOSFET is important and should be as low as possible. The Qg of the MOSFET will also have an impact on the heat dissipation of the chip, especially if the input voltage to the chip is high.
Charge is dictated by the equation:
Charge (Q) = Current (I) x Time (s)
Since Frequency is the inverse of Time, we can write
So we can calculate the current needed to flow into the chip, just to charge the gate capacitance of the FET. Since heat is the product of voltage and current, if the gate charge is high and/or the switching frequency is high, the heat dissipation in the chip will be high if the input voltage is high.
Once the MOSFET has switched on, the MOSFET presents a small dc resistance between its Drain and Source terminals. This is the MOSFETs ‘Drain Source on resistance’ or RDSon. Again, this needs to be as low as possible.
Now, MOSFET manufacturers reduce the ON resistance of the MOSFET by constructing many parallel conduction paths between the Drain and Source. Thus, like connecting resistors in parallel, the ON resistance comes down with more parallel paths. However, in connecting Drain Source paths in parallel, a negative effect is that the Gate Source capacitance (Qg) is also connected in parallel, so a low ON resistance (and hence low conduction loss) sometimes implies a high gate source capacitance (hence high switching loss). Thus the MOSFET that is chosen should be a compromise between these two characteristics. In addition, high current MOSFETs tend to come in much larger packages, so meeting the ideals of low ON resistance and low Qg might violate a space requirement spec, so the selection process has to start over. Engineering, as ever, is a compromise.
Indeed looking at the selection tables of the MOSFET manufacturers, it is better to select a MOSFET with a low ON resistance (less than 10mOhms), then filter this selection to remove MOSFETs with a Qg of greater than 10nC, then select a MOSFET from this list, as long as the Gate turn on voltage, Vds and Id can be met. Starting by selecting MOSFETs with a Vds of between 20V and 30V might rule out some higher voltage FETs that are better suited to lower voltage designs. Failing that, download all the results to a spreadsheet and sort from there. I have never had much luck with the parametric searches on MOSFET websites.
Alternatively, download all the MOSFET characteristics into a spreadsheet, remove the ones that don't meet the VDS and ID requirements, then add a column called FOM (Figure of Merit). This column should contain the value RDSON x QG. Then sort by this column and pick the FET with the lowest FOM. This part will be the best compromise between RDSON and QG and ideal for the top MOSFET.
The Fairchild FDS6680 represents a good compromise between low ON resistance and low gate charge, but its SO8 package is large and therefore might be unsuitable for compact designs.
Rectifier Diode Choice
When the MOSFET switches off, the secondary voltage ramps rapidly in order to maintain current flow. Many diodes are not fast enough to react to this voltage change, resulting in a large spike on the Drain of the MOSFET. This can (and does) destroy the MOSFET.
Therefore Schottky diodes should be used in all dc/dc converter designs. Ultra fast diode have a response time of 10’s of nanoseconds, standard rectifier diodes have a response time of several microseconds, whereas a Schottky has a response time in the order of a few nanoseconds. Schottky diodes also have a much lower forward voltage drop (0.3V) compared with standard rectifiers (0.6V) so half the power is wasted as a result of VxI losses.
When choosing a Schottky diode, the key parameters are: forward voltage drop (should be as low as possible), forward current (this should be greater than the peak secondary current) and reverse voltage rating. When the FET is charging the primary, there will be a voltage across the primary equal to the input voltage. With a flyback converter, the anode of the secondary rectifier diode will see the same voltage, but multiplied by the turns ratio. So in our example, for a 5V input, the secondary winding will develop 15V across it during the charging of the primary. Its cathode will be held as the output voltage (12V), so the diode needs to withstand a reverse voltage of 27V.
In this design example, the MBRS340 is a good choice with a reverse voltage rating of 40V and a forward voltage of 0.53V at 3A peak current.
Output Capacitor Choice
Unlike the buck converter that has a continuous current flowing from the inductor into the output capacitor, the flyback converter output capacitor has to keep the output voltage alive when the primary is being charged.
The output ripple is made up of 2 components: the ripple caused by the output capacitor discharging when the primary is being charged and the ripple caused by the inrush current from the secondary winding into the ESR of the output capacitor. Low ESR tantalum capacitors normally have an ESR of <100m Ohms and ceramic capacitors are significantly less. Putting 2 capacitors in parallel will double the value and half the ESR.
The ripple caused by the discharge of the output capacitor while the inductor is charging is dictated by
where i is the load current in Amps, C is the output capacitance in Farads and dv/dt is the change in output voltage with time.
Earlier we calculated that the MOSFET switches on for a period of 2.25us. If we require a discharge ripple of 0.5% (60mV) with a load current of 100mA, this implies we need a capacitance of
or 3.75uF.
The ripple caused by the ESR is a product of the peak secondary current and the ESR. In our example the peak current is 364mA and the ESR is of a typical tantalum capacitor is 70m Ohms, giving a ripple of 25.5mV.
Therefore a capacitor of 4.7uF and an ESR of 70m Ohms should enable us to comfortably meet our ripple requirement.
Other Points to Note
The feedback resistor values can be calculated using the Feedback Resistor Calculator:
The feedback resistors were set to give a voltage of 12.04V. Keep the resistor values in the less than 500k. If they are too high, they will form a low pass filter (and hence a phase shift) with the input capacitance of the feedback pin. Higher resistor values are also more susceptible to induced noise from the inductor. If the values are too low, they will drain current from the output unnecessarily.
Please refer to the datasheet for full information on the operation of the LTC3873-5
This text has explained the basics of flyback converter switched mode power supply design and is applicable to most flyback converters. Refer to the individual datasheets for a complete guide to designing with that particular part.
The final LTspice circuit can be downloaded here (right click over the link and save as a '.asc' file):
LTspice is a registered trademark of Analog Devices Inc
Sitemap: www.simonbramble.co.uk/sitemap
© Copyright Simon Bramble